Description
Description
|
WEIGHT
|
33.7 oz (956 grams)
|
|
BATTERY PERFORMANCE
|
Up to 36 hours.
|
|
BATTERY TYPE
|
Li+ (2.2 Ah)
|
|
CHARGER TYPE
|
Li+ (8,4V; 1000 mA)
|
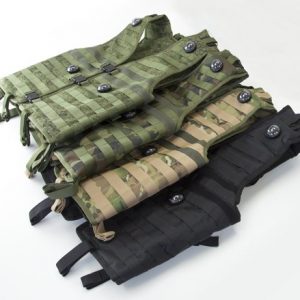
New Load Bearing Laser tag vest from LASERWAR company combines the lightness of a laser tag vest and the functionality of load carrying system. Equal hit sensors distribution on the entire surface, reliable attaching and adjusting systems of this vest and the possibility of attaching various of modular gear makes this laser tag vest one of the most practical devices.
APPEARANCE
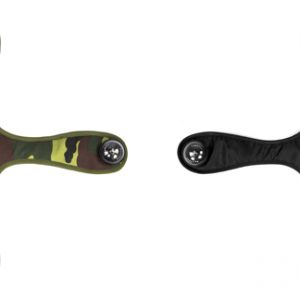
Load Bearing Laser tag vest is made of fabric and includes 8 hit sensors and 2 control units. The control units are located on the back of the vest and do not obstruct player’s movements. All hit sensors can be nominally divided into 3 zones: dorsal, humeral and frontal. Hit sensors are equaly distributed on entire area to ensure maximum hits fixation. Thus, even a player that is shooting from around the corner can be hit by an opponent. The sensors are distributed over the surface of the vest so that there are always some “free” sensors, that are not covered by a weapon or hands.
The weight of the vest is 34 oz (956 grams), the power source is a 2.2 Ah lithium battery, which allows the kit to operate up to 36 hours without recharging. This battery is located in one of the control units. Another unit is responsible for vest activation. The vest is turned on with a special admin key.
![]()
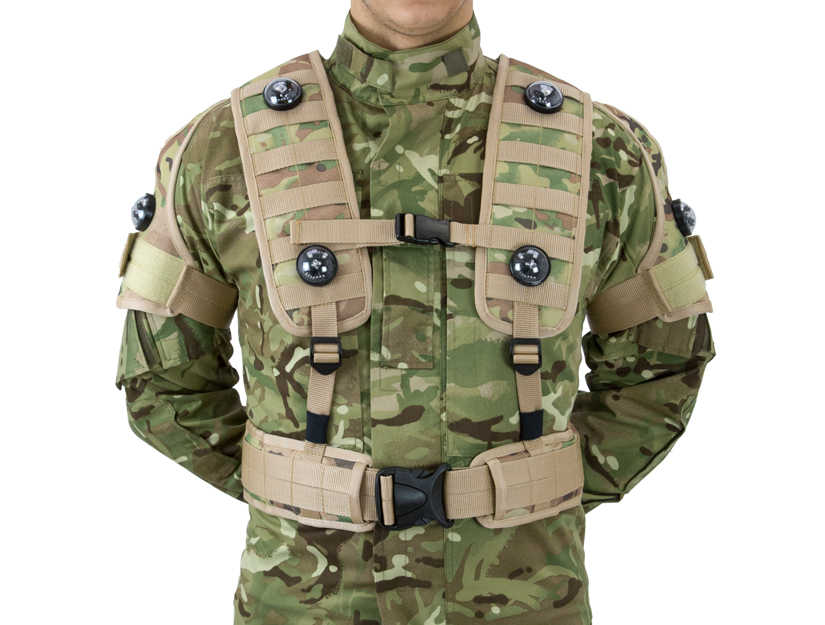
The design of the vest uses a reliable, time-proven and well-known MOLLE system. The vest has nylon slings, forming cells. They can be attached a various modular gear with, pouches, grenades, flashlights and even a laser tag knife.
Laser tag vest also has additional belt encircling the plyaers’ body, it performs lumbar support in addition to the slack off function, reducing the load from a carrying system. In the chest and waist are, the vest is fixed with 2 fastex fasteners. Shoulder pads are also very convenient. They are fastened around the hand with Velcro textile fasteners, which ensures using it with players of all sizes.
The vest is designed in such a way that the player is be able to both put it on and remove it himself, without the help of other players or the instructor.
![]()
The inner surface of the vest and lumbar support has a lining made of a special hygienic Air Mesh grid, which protects all electronic staff from moisture. Two pairs of adjusting straps allow you to change the distance between the main part of the vest and lumbar support, depending on the player’s growth. Also, there are black rubber bands that fix the wrists of the adjusting straps.
FUNCTIONAL
This model of the vest is based on the 8th generation electronics. This vest can be used both in conjunction with the headband and without it. Activation steps are the following:
The steps for connecting the “Vest – Gun” kit.
1. Turn on the gun.
2. Turn on the vest.
3. Wait for their connection (the vest will emit a beep, accompanied by frequent flashes and vibroindication).
4. Activate the kit with «new game» command from a remote control or medkit.
The steps for connecting the “Headband- Vest – Gun” kit.
1. Turn on the gun.
2. Turn on the vest.
3. Turn on the headband.
4. Wait for their connection.
5. Activate the kit with «new game» command from a remote control or medkit.
The steps for connecting the “Vest – First Gun – Second Gun” kit.
1. Turn on the first gun.
2. Turn on the vest.
3. Wait for their connection.
4. Turn on the second gun.
5. Wait for its connection with the vest (after a short signal vibroindication will disappear).
6. Activate the kit with «new game» command from a remote control or medkit.
The steps for connecting the “Headband – Vest – First Gun – Second Gun” kit.
1. Turn on the gun.
2. Turn on the vest.
3. Turn on the first switch on the headband (you need headband for 2 taggers).
4. Wait for their connection.
5. Turn on the second gun.
6. Turn on the second switch on the headband.
7. Wait for their connection (single sound and vibroindication of the headband).
8. Activate the kit with «new game» command from a remote control or medkit.